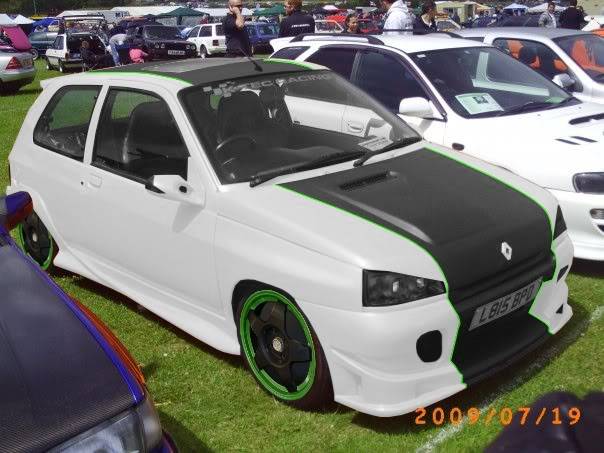
Most of you will know my Clio for those that dont heres a quick reminder...
Back when it was first painted Electric Orange:

As most of you will Know it...
 Thanks to Last Ditch Photography for this Image.
Well the Clio's been Orange for a few years now and seeing as its a daily driver it was starting to show the wear and tear then this year back in Jan the Clio was involved in an accident (not at fault)
Once the Insurance Cheque Came through i felt it was time to update the clio as it now required more than just a quick touch up to get it back to a standard i would be happy with...
I asked our very own Photoshop Guru Dan (DanielWatts) if he could chop the Clio using my new colour combo and design thoughts...
I took the car over to Carl aka
WRCPulsar after he agreed to help me out on this re-invention of the clio, things started like this:
First Job was to Rub down the original paintwork and get filling the cracks, repairing the damage etc..


Was then time for a bit of a wet flat and wash down....


Once the first stage of prep was complete it was then time to Strip down the car, remove windows, trims etc then get busy masking up the car:

Thanks to Rob (hybridRob) and dave (Shilly) for the Masking Materials :yes:


Then it was time for paint or i like to call it "primer time"


Then a Bit of Guide coat was applied:


Back to Paint in a bit....
With the new plans and colours ive decided on for the car the bucket seats were the only things that wernt going to work with the car due to the Orange stitching, after racking my brains for a while i came up with the idea of using a black permanant marker to dye the stitching, heres the results:
Before:

After:

After having such a result and saving myself a fortune on not having to replace the seats i then thought they now looked a little bland, i decided on spraying the harness inserts..

My wheels were looking tired and as im after a new look i thought some new rims where in order, found a bargin on ebay and ended up with these:

Was happy to have the spokie dokie disharoonies, but they needed something to make them out of the ordinary... Update on these in a bit

Back to the respray.........
The primer now had a few days to settle and go nice and dry, was then time to get busy with the Wet and Dry paper, so out came the 400 and 600 Grit


Even got Gina in on the Act, Thanks for the help preping the Car hun
x


With all the hard work out the way, was then time to degrease,tac rag and then mask ready for paint:


Now time to get some colour on the car:


Now for the detailing, the Roof, bonnet and rear difusser had to be masked off and painted black:


Once un-masked it looked a little like this:


With the Car almost painted, the front bumper needed the black detailing, so this had to be attached and masked up:

Once the car had time to dry it was then time to add the green detailing to the bonnet, bumper and interior, no pics of the car this time as the camera died on me, but i have a shot of the interior plastics and bonnet badge:

Now back to the wheels, having got them off eBay second hand 2 of the wheels had slight kerbing and one was a little scratched it was time for a refurb and a special touch to be added.. i sent them off and this is how they came back:


New tyres fitted (thanks again to Rob for sorting these out for me
)

Then to give the interior a bit of a transformation:
Before:

After:

(yes i know i need new matts
)
Final touch before fitting the wheels was to repaint the calipers, from Orange to Black:

Now with all the hard work complete... its time to show you all the final result:

Rolling shot: (thanks Scott)

*A massive thank you to Carl aka WRCpulsar @ CatlinMotorServices 07723042212 for all your efforts and hospitality.. during the respray
Thanks to Carrie too
*Thank you Dave for the Masking Materials,
*Big thanks to Rob for sorting the tyres and delivery and masking materials
*Thanks to Gina for all your help in preping the car
*Last but not least Thank you to Peanut for sorting me out with a new set of no. plates
Remember.... BUILT NOT BROUGHT!
**UPDATE**
Took the Clio for a Small Photo shoot... Here's a few pics


 UPDATE: 18.10.2010
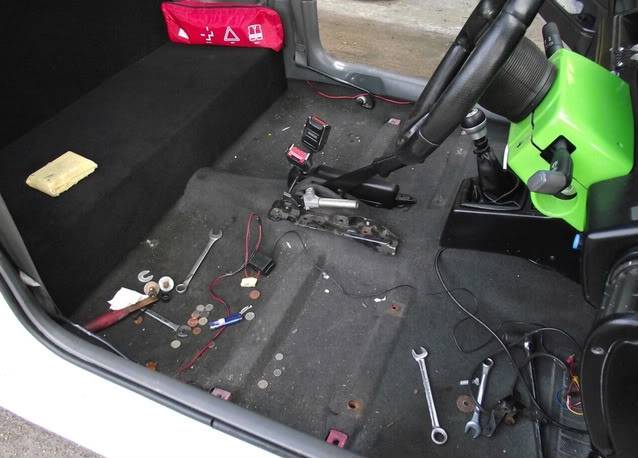
 Time for a bit of a diet for the Clio,
Seeing as the rear of the car is Rather Low, the back seats have been made redundant for a while now and i thought whats the point of keeping something that doesnt get used..
This is how it looked...

Removed all the rear bench, seatbelts, etc... Was Approx 50kg's in weight in total :eek:

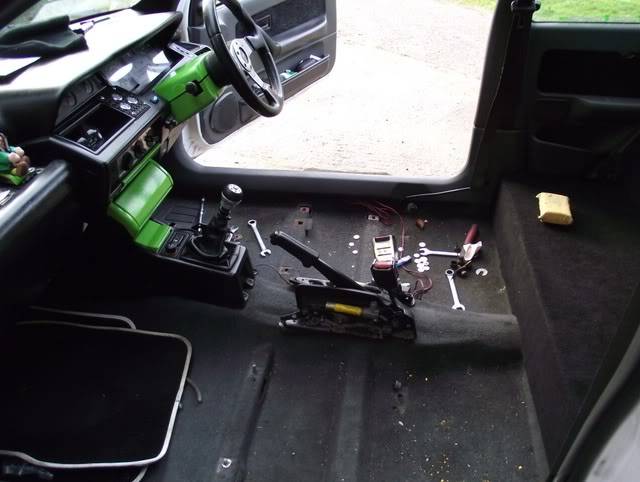
Without the seats it looked rather shabby to say the least so was off to go and get some MDF to board over where the rear seats used to be...

After a trial fit and a nice bit of trimming, things started to look a little like this..

All that was left was to make a back to seperate the boot from the interior..

Was rather pleased with the final result, looks much neater, the weight saving has really improved the acceleration, and has made way for a new addition coming soon...
 UPDATE: 23.10.10
After having angel eyes for a few years now they were starting to look a little tired, and after surviving a small prang, part of them ending up being fixed in with cable ties ( a bodge i know but hey it worked
)
This is how it looked:

After searching high and low for a set of Smoked/Tinted angel eyes as a replacement, i ordered a set from K-tec Racing only for them to ring me a few later to tell me that they had dis-continued them

After a another search i found a set on eBay that was too good to pass up..
Once they turned up I decided to change the Halo Rings from yellow to blue/white Leds, and also treated myself to some Silver-Tec Indicator bulbs
This is how they now look fitted:

Time for a small interior change, after a visit to
http://www.metal-monkey.co.uk/ i ended up with a Stainless steel Facia for my Heater Controls also decided on a Green Backing..
Started off like this:

Had to remove the Heater Knob's:

The the Backing had to be removed, Peeled off rather easy, was then time to remove the glue using some Brake Cleaner:

After it was all prep'd was time to get busy with the new "Green" backing:

Then came the Lazer cut stainless still facia:

After Cleaning up the Heater Knobs, it was time to re-attach them:

And Finally fitted in the car (apologises for the dark image):
 UPDATE: 24.10.10
Big Brake Conversion..
Seeing as my current stoppers were due replacement Discs and Pads, I thought now was the time for an upgrade, Ive always said "if your going to do something do it properly" So after a phone call to K-Tec Racing there 'Fast Road, Big Brake Kit' was on its way to me..
One issue with this was that the kit was to fit 16v/Williams Clio's, Some research was involved, after looking on a few Renault forums, I was informed that the Calipers would bolt straight on. I managed to find a set of Lucus (Williams) calipers, after a test fit they wouldnt clear the Disc's
...
Ater a little more research i was told there's 3 types of Calipers

Fitted on the 1.8 16v im braking was a set of Girling calipers. These didnt fit either, then after a quick brain storming session with Carl (CatlinMotorServices) We made a set of calipers from the two different Sets. Using the Carriers from the Girlings and the caliper from the Lucus

Old Brakes:

New Disc's:

Also whilst i was going for an upgrade i thought it was only right that i added a set of braided Hoses, I ordered a set of Hel Braided lines and lucky for me they provide them with a kawasaki green finish:

Old Vs New:

Carl then set about refurbing my calipers, First up was to clean them up, Carl being the professional he is, set about Shot Blasting them:

Then went on to Paint them using the kawasaki paint left over from the Clio's respray:

Before:

After:

Discs Fitted:

All Fitted and looking the Nuts if i do say so myself:

 Big thank you to Carl @ CatlinMotorServices: 07723 042212 WRCPulsarUPDATE 14.11.10
Some of you may Know that i had a bit of a hole in my dash from when i butchered it tio make room for a 7" screen, after a while i soon got bored with the idea of having a screen in my dash and started to refit all the parts i removed such as oil gauges, Coin trays etc.. this left me with one part that i couldnt get back to stock.. the 3 in dash switches for Hazzard, Rear fog and Rear dimester... the only option i had was to Modify, to create something to house the switches and cover up the whole.
As i knew i couldnt get the O.E switches back in place, i decided to order some Savage switches as used in Caterham 7's and other kit cars. These soon turned up and i needed some way of mounting them.
Adam came to the resuce with some ally chequer plate, i wasted no time in getting the ally cut to size and the holes made for the new switches...

After fitting the switches, it looked something like this...

Happy with the results, i thought that after spending the money on new "fancy" switches it would be better to make more of a feature of them, i found the silver on silver look a tad to "bling" for my liking.. I then set about painting the cheque plate in the same black as my dash..

Next up was fitting them, not being renault specific this was quite a challenge, so i enlisted the help of
Mattvvt aka the wiring wizard to help me out, after a few hours of messing about, soldering, adding diodes all was well and the new switches were "ALIVE"!!
Then was time to bolt the pannel into place using some stainless dome head bolts...

And here's how they look illuminated..
 DOOR HANDLES:
After speaking to
Potter at last weeks meet, he showed me some new carbon fibre cloth and the parts he had trimmed in this, being a lover of all things carbon i had to try this out...
After picking up some of the magical weave material i decided the first port of call would be my door handles as they were looking a little tatty with the painted finish on them.

The wrapping process is really quite simple and took me about half hour to do both handle trims...

This is how they look fitted:

More Carbon wrapping coming soon....
UPDATE 23/1/2011:After ordering some guages, I ordered a pillar guage holder only to find it wouldnt fit without serious work, so I then ordered a second one that looked a bit more promising.. unfortunatly this wasnt the case and it was back to the drawing board.
After a bit more searching and investigation I found a company that provided custom made gauge holders, after a call to RGM (
www.rgmstyling.com) a Pillar mount was on its way..
The fit was A1, and after a little trimming to fit my 52mm gauges it was ready to fit, before I fitted the Pod, I decided to trim the A-Piller in Carbon.
Didnt manage to get progress pics, but heres the guages and pillar in all their glory...


One of the Carbon Trim....

After having my club sunstrip for a while, It was looking a little tired so I decided a new one was in order
Out with the Old...

In with the New...


Whilst i was getting busy with the vinyl, i decided to re-new the side window stickers
 UPDATE: 13/02/11
Right after finding a bargain rollcage on eBay, the money was paid and a K-tec Polished Stainless steel cage was on its way..
After unwrapped it looked a little something like this:
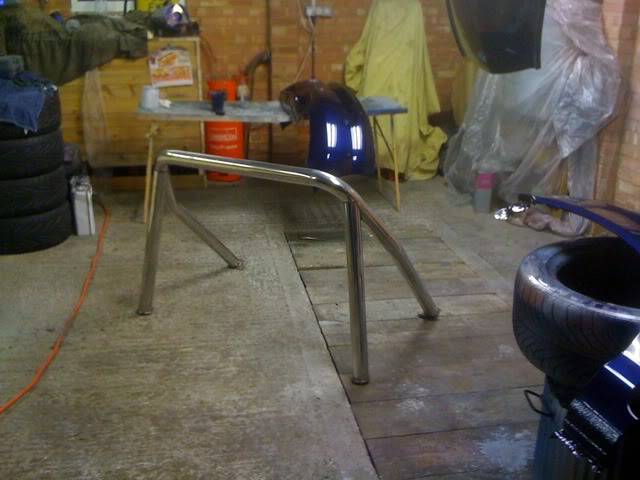
With the Clio's theme of black white and green there was only one colour for the cage...
You guessed it..

GREEN!! :yes: Big thanks to Carl for taking time out of his busy schedule to lay some paint on the cage...
Then came the fitting... first thing first was to remove the seats not too much of a ball ache and they were soon out.
next was to position the cage within the Clio after a few fiddly moments and removing the rear "jesus" handles it fitted like a glove..
A little trimming to my MDF backing and it was time to bolt it in...


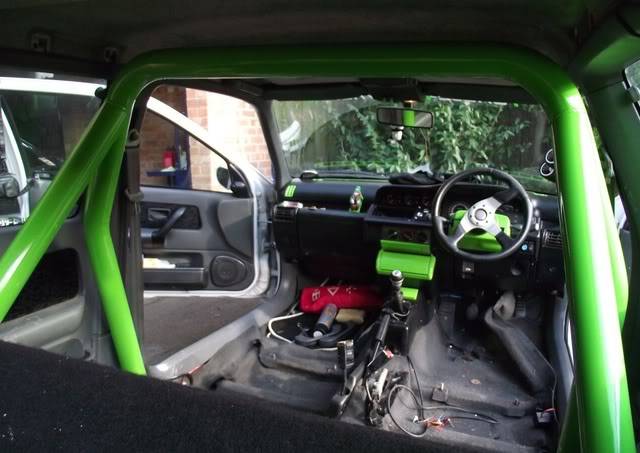
With the cage fitted securely it was time to refit the seats, First up was a little clean up making the most of the seat being removed..

Then back in with the Passenger seat..
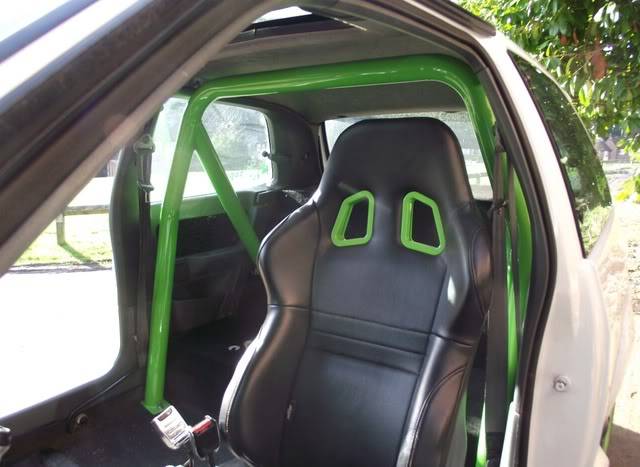
Then in with the drivers seat..

Now just to sit back relax and check out the days hard work..

Big thanks to Carl (CatlinMotorServices 07723042212) for painting and help with fitting the cage :yes:


